Arrange wall art by mapping, centering at eye level, and grouping with balance.
If you want a wall that feels pulled together, start with a plan. In this guide, I’ll show you how to arrange wall art like a pro. You’ll learn simple rules, smart tools, and tested steps. I’ll share what works in real homes, what to avoid, and how to fix common slip-ups. By the end, you’ll know exactly how to arrange wall art that looks natural, balanced, and personal.

Start With Your Space: Scale, Sightlines, and Story
How to arrange wall art starts with the room, not the frames. Look at the wall size, the furniture, and the view from the door. Ask what story you want the art to tell. Calm and quiet? Bold and fun? This sets the tone.
Use the 57–60 inch rule for eye level. That means the center of the art sits about 57 to 60 inches from the floor. This works in most rooms and for most people. Over a sofa or console, hang the bottom edge 6–8 inches above the top of the furniture. Keep the art width at about two-thirds of the furniture width.
Balance size and weight. One large piece can anchor a wall. Or group several small pieces to act like one. Keep spacing even. I use 2–3 inches between frames for tight grids. I use 3–4 inches for mixed gallery walls. Step back often. If it feels cramped, give it breathing room.
In my studio, I test layout with painter’s tape on the wall. I outline sizes in place. The room tells me fast if the plan is too heavy on one side. It is a simple trick that saves time and patching.

Choose and Mix Art With Purpose
How to arrange wall art goes smoother when you pick the right mix. Start with an anchor piece. This could be a large print, a canvas, or a mirror. Build around it with smaller works. Vary the mediums for depth. Think photos, textiles, drawings, and objects.
Match frames to the mood. Black frames feel crisp. Wood frames feel warm. Thin metal frames feel modern. Use mats to give small art more presence. White mats are safe and bright. Off-white adds softness. Keep frame colors to one to three tones for a clean look.
Plan a color thread. Echo a color from a rug, pillow, or throw. This links the wall to the room. If you love bold art, keep frames simple. If the art is soft, a bold frame can add punch.
Tip from the field: when a client loved mix-and-match frames, I kept mat sizes consistent. It made a quirky wall feel neat, not messy.
Plan Your Layout: Methods That Work Every Time
How to arrange wall art well comes down to layout. Use one of these proven styles:
- Grid layout. Best for photos or prints in the same size. Keep gaps the same. Aim for 2–3 inches between frames.
- Linear row. Works over beds, sofas, and credenzas. Align tops, middles, or bottoms. Pick one line and stick to it.
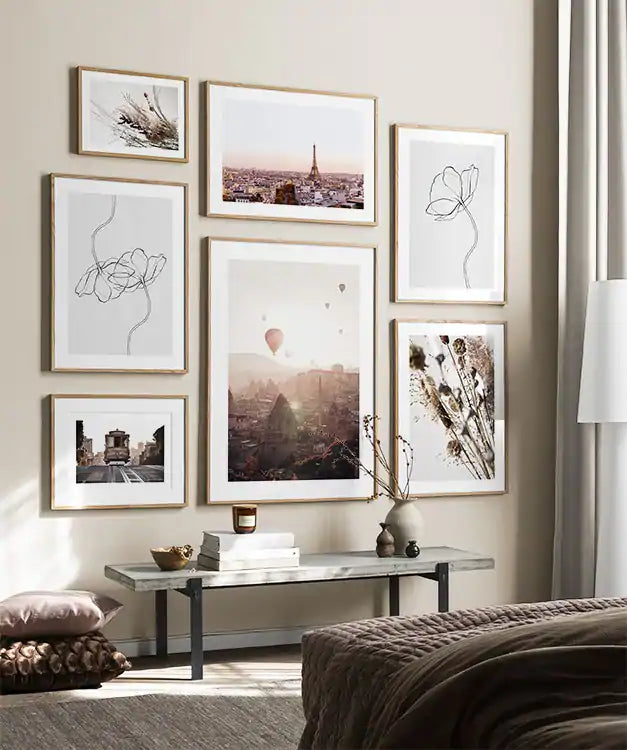
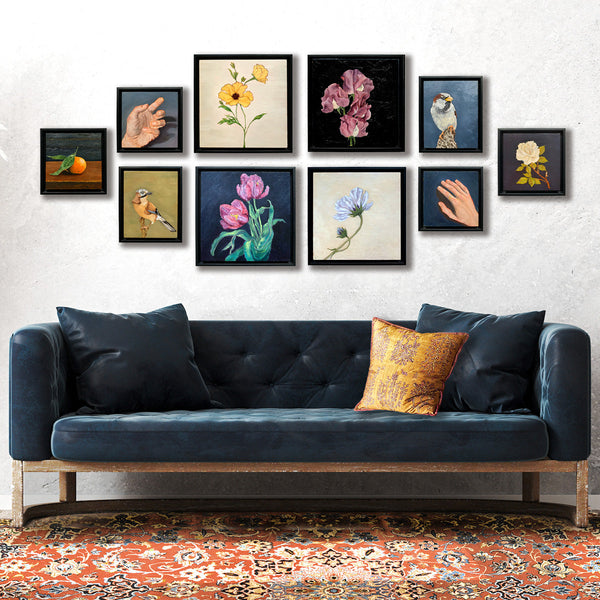
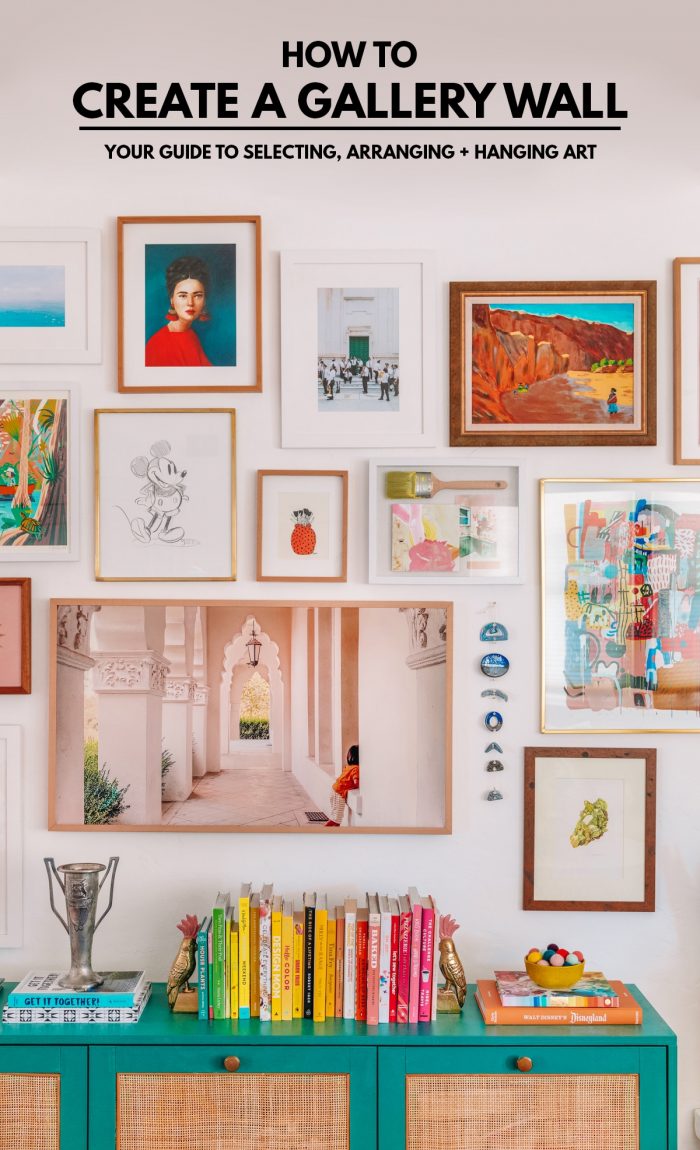
- Salon mix (gallery wall). Blend sizes and frames. Start with the largest piece in the center or slightly off-center. Build out with pairs on each side.
- Diptych or triptych. Two or three related pieces. Space them 2–4 inches apart to read as one unit.
- Staircase rise. Follow the angle of the stairs. Keep the center line of the group parallel to the handrail.
Use paper templates. Trace frames on kraft paper. Cut them out. Tape them to the wall with low-tack tape. Shift until it feels right. Measure from the floor and from nearby furniture. Mark nail spots on the paper. It is fast and clean.
A quick rule for balance: think of a seesaw. If one side has a heavy dark piece, add two lighter pieces on the other side. Match visual weight, not just size.
Tools, Hardware, and Wall Types
How to arrange wall art includes the right tools. Gather a tape measure, level, pencil, blue tape, hammer, and a stud finder. For precise work, a laser level helps. For rentals, use damage-free picture strips within weight limits.
Pick the right hangers. Drywall hooks hold more than nails. For heavy art, use anchors or screw into studs. On brick, use masonry screws and a hammer drill. On plaster, pilot holes and anchors help prevent cracks. Always check weight ratings on hardware and wires.
Use two hooks per frame. It keeps frames from tilting. Use D-rings with picture wire for easy leveling. Add clear bumpers at the bottom corners. They protect paint and help frames sit flat.
I once rehung a 40-inch mirror for a family room. One hook sagged over time. Two hooks fixed it. No more tilt.

Build a Gallery Wall Step by Step
How to arrange wall art as a gallery wall is simple if you follow steps:
- Define the area. Set left, right, top, and bottom bounds with tape.
- Pick an anchor. Place the largest piece near the center.
- Add pairs. Place two medium pieces on opposite sides to balance.
- Fill gaps. Use small frames to connect edges and corners.
- Keep gaps even. Use 3–4 inches between frames for air.
- Test with templates. Adjust until the group reads as one.
- Hang from the center out. Check level as you go.
Pro tip: photograph each test layout on the floor. Compare shots on your phone. Your eye will spot odd gaps fast.
Room-by-Room Tips
How to arrange wall art changes a bit by room. Here is what works.
- Living room. Center over the sofa. Keep the group two-thirds the sofa width. Bottom of art 6–8 inches above the back.
- Bedroom. Keep calm. Use soft colors or simple grids. Hang lower over the headboard. Leave space so pillows do not touch the art.
- Dining room. People sit more. Lower the center closer to 57 inches. Use pairs or a single large piece.
- Entryway. Make a strong first look. One bold piece or a tight grid. Add a mirror for light.
- Office. Use a mix of inspiration and calm. Place art in your sightline from the desk. Avoid glare behind monitors.
- Hallways and stairs. Go narrow and tall. Follow the rise on stairs. Keep edges clear of door trim.
Lighting matters. Picture lights, track lights, or wall washers help. Avoid direct sun on art. UV can fade prints and textiles over time.
Color, Theme, and Visual Flow
How to arrange wall art also means guiding the eye. Repeat colors and shapes. Triangulate. If you use teal three times, place those pieces in a loose triangle. The eye will connect them and move with ease.
Play with rhythm. Mix large, medium, and small pieces. Use white space to let the eye rest. A busy wall needs a simple piece close by. A plain wall can handle bolder art.
If you have many family photos, mix in texture. Add a shadow box, a pressed leaf, or a small mirror. This breaks the monotony and adds depth.
Mistakes to Avoid and How to Fix Them
How to arrange wall art often fails for a few simple reasons. Here is how to avoid them.
- Hanging too high. Use the 57–60 inch center rule. Lower is almost always better.
- Tiny art on a big wall. Scale up or group small pieces. Use larger mats and frames.
- Uneven gaps. Pick a gap size and stick to it. Use a spacer card when you hang.
- Frames that fight. Limit frame colors to one to three. Keep styles in the same family.
- Skipping a plan. Use paper templates. It saves time and holes.
I once tried to wing a salon wall on a deadline. It looked busy. A quick reset with templates made the flow click. Planning wins.
Budget, Sourcing, and Sustainability
How to arrange wall art does not need a big budget. Mix high and low. Pair an original with prints. Use thrifted frames and swap in acid-free mats. Digital prints from museum archives are a gold mine and affordable.
Protect your art. Use UV-protective glazing for sunny rooms. Use acid-free mats and backing. This keeps paper art safe longer. Rotate pieces seasonally to reduce fade and to refresh the room.
Sustainable tips. Refinish old frames. Buy from local artists. Print on recycled paper when you can. Good for your walls and the planet.
Frequently Asked Questions of How to Arrange Wall Art
How high should I hang art on a blank wall?
Aim for a center point at 57–60 inches from the floor. This matches average eye level and feels natural in most rooms.
How far apart should frames be in a gallery wall?
Keep 2–3 inches for tight grids and 3–4 inches for mixed layouts. Consistent spacing is what makes a group feel planned.
How big should art be above a sofa or bed?
Choose art or a group that is about two-thirds the width of the furniture. Keep the bottom edge 6–8 inches above the top.
Can I mix black-and-white photos with color art?
Yes. Repeat a color from the art in frames, mats, or pillows to tie it together. Use consistent spacing for a cohesive look.
What if my walls are brick or plaster?
Use anchors made for your wall type and check weight limits. For rentals or delicate walls, use damage-free strips within ratings.
How do I plan a staircase gallery?
Follow the angle of the stairs with a central line. Keep the center of each piece aligned to that line for a smooth rise.
Should frames match or can they be different?
Both work. Matching frames feel clean and modern. Mixed frames feel collected; keep to one to three finishes for harmony.
Conclusion
You now know how to arrange wall art with confidence. Start with scale and eye level. Pick an anchor. Keep gaps even. Use templates and the right hardware. Add rhythm with color, shape, and space. Test, adjust, and trust your eye.
Take one wall this week and try these steps. Snap a photo, shift pieces, and watch the room come alive. Want more tips and layout guides? Subscribe for fresh ideas, or drop a comment with your wall size and style and I’ll help you plan it.