Measure the wall space, opening, and depth. Confirm studs, clearances, and door swing.
You can avoid returns and re-dos with a few simple checks. This guide shows how to measure for medicine cabinet the right way, for both recessed and surface-mount styles. I’ll share pro steps, common pitfalls, and field notes from years of installs, so you can pick the right size with confidence.
What you need before you measure
Gather a few basic tools and do a quick site check. This makes the rest easy and fast.
Tools and setup
- Tape measure Use one with a stiff blade for one-hand measuring.
- Level Check plumb and level where the cabinet will sit.
- Stud finder Find studs and mark both sides of each one.
- Pencil and painter’s tape Mark edges without scuffing paint.
- Notepad or phone Take photos and record sizes as you go.
Site checks that save you time
- Check the wall type Is it a 2×4 interior wall or something else.
- Scan for hazards Look for switches, outlets, vents, plumbing, or a pocket door.
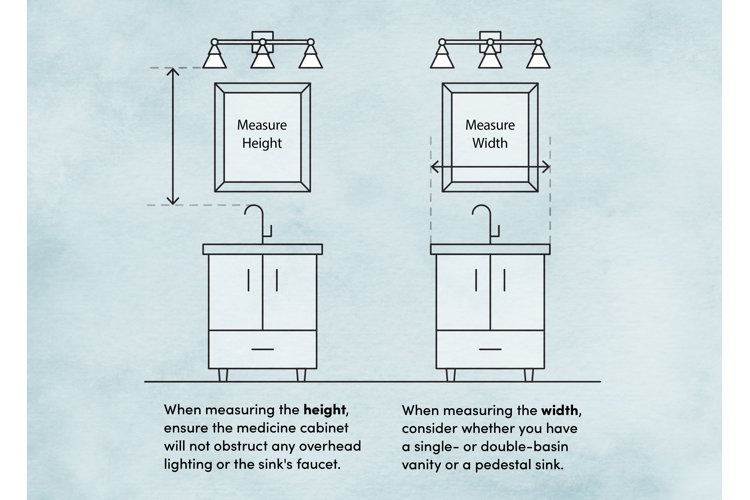
- Measure the vanity width and faucet height These control where the cabinet can sit.
- Note the light fixture size and height You need door swing room and hand clearance.
Pro tip from the field
- I mark a full outline with tape first. It lets you “see” the cabinet on the wall. You spot clashes early, like a light too low or a door that hits a sconce.

Step-by-step: how to measure for medicine cabinet
Use this workflow whether you plan a recessed unit or a surface-mount. It covers size, height, and door swing.
- Measure the available width
- Measure the wall space above the vanity or where the cabinet will sit.
- Leave at least 1 to 3 inches of open wall on each side for a clean look.
- If centering above a sink, measure the sink centerline and mark cabinet center on the wall.
- Measure the available height
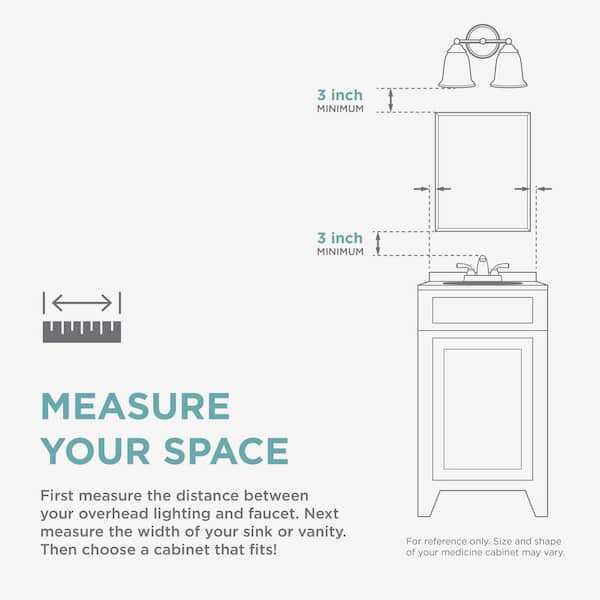
- Note the faucet height and the bottom of any light.
- A simple rule is to keep the bottom of the cabinet 3 to 8 inches above the faucet.
- Aim for the cabinet center around 58 to 64 inches from the floor for most users.
- Check depth and projection
- For surface-mount, note how far the cabinet projects from the wall.
- Make sure doors and handles clear faucets, lights, and shelves.
- For recessed, measure cavity depth from drywall face to the back of the stud space.
- Confirm door swing
- Single-door cabinets need full swing width without hitting a wall or light.
- Double doors reduce swing reach but still need side clearance.
- If space is tight, consider sliding doors or a mirrored tri-view.
- Mark and mock up
- Use tape to outline the cabinet size on the wall.
- Open a door-sized piece of cardboard like a hinge. Watch for collisions.
- Adjust size or placement until nothing hits.
- Record your final numbers
- Write down width, height, and depth.
- Note centerline and final bottom height.
- Keep a photo of your tape marks for reference when ordering.
Where this matters
- Hotels often set mirrors so guests of many heights can see well.
- In small baths, I use narrower cabinets to avoid lights and outlets.

Recessed vs surface-mount: measuring changes to know
You measure both styles, but the rules shift a bit. Here is how to measure for medicine cabinet when the unit sits in or on the wall.
Recessed cabinets
- Find studs and measure stud-to-stud space. Most 2×4 walls have about 14.5 inches between studs.
- Many recessed models are sized to fit between studs. Typical rough openings are about 14 x 18 inches or larger.
- Check cavity depth. A 2×4 wall gives about 3.25 inches of usable depth after drywall.
- Scan for pipes and wires. If you hit a vent stack or drain, choose a surface-mount instead.
Surface-mount cabinets
- Width and door swing matter most. Check side clearance near walls and lights.
- Depth can affect faucet reach. Keep at least a hand’s width in front of the faucet.
- Weight matters. Plan to hit at least one stud with mounting screws.
Tip from experience
- On older homes, studs can be off-center. Never assume perfect 16-inch spacing. I always verify both sides of each stud before I cut.

Common sizes, clearances, and placement rules
These are field-tested ranges. Always check your specific model.
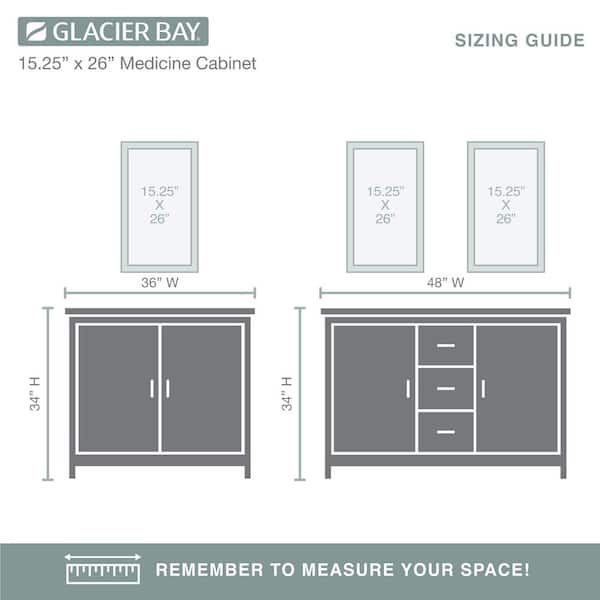
Typical cabinet widths
- 16 to 20 inches Good for powder rooms and narrow vanities.
- 20 to 24 inches A popular fit for 24 to 36 inch vanities.
- 24 to 30 inches Best for larger vanities and double sinks.
Smart clearances
- Side clearance 1 to 3 inches from nearby walls or trim looks balanced.
- Above faucet 3 to 8 inches keeps splash off the mirror and allows reach.
- Below light 2 to 6 inches helps avoid glare and gives room to open doors.
Mounting height guide
- Bottom height 48 to 52 inches from floor is a common start point.
- Center height 58 to 64 inches suits most users.
- For kids, drop the bottom to about 44 to 46 inches if needed.
Safety and code notes
- Keep 6 to 12 inches from outlets and switches for door swing.
- Use GFCI-protected circuits near water.
- If hardwiring a lighted cabinet, follow manufacturer specs and local code.

Fit checks: doors, lights, and outlets
This is where problems show up. Do these checks before you buy.
Door swing and lights
- Open the mocked-up door fully. Watch for sconces, shelves, and trim.
- For side sconces, keep at least 2 inches of free space from the cabinet edge.
- For an over-mirror bar, leave room so doors do not hit the fixture base.
Faucet and projection
- If the cabinet is deep, stand at the sink and “lean in.” Make sure you can still reach.
- Handles should not stick out so far that they catch clothing.
Outlets and switches
- Check both sides for switches. A left-hinged door can hide a switch behind it.
- If your door blocks a switch, swap the hinge side or choose a narrower cabinet.

Mistakes to avoid and pro tips
These are the traps I see most often and how to dodge them.
Mistakes
- Assuming stud placement This can ruin a recessed cutout.
- Ignoring door swing Doors that clock a sconce are a headache.
- Forgetting wall plumb A cabinet can look crooked on a bowed wall.
- Skipping splash clearance Water stains happen if you mount too low.
Pro tips
- Use a long level Check both vertical and horizontal lines before you mark.
- Shim for perfect flush Even small shims make a big visual difference.
- Order once, measure twice Confirm width, height, depth, and hinge side.
- Keep the box until done Return is easier if the finish has a flaw.
What I learned the hard way
- I once set a beautiful tri-view. The center door clipped a tall faucet by a quarter inch. Now I always mock with cardboard and open the “door” all the way.
A simple worksheet to use on site
Copy these lines and fill them as you measure. It speeds ordering and install.
Project info
- Vanity width:
- Sink centerline from left wall:
- Wall type and stud size:
Recessed notes
- Stud-to-stud space:
- Cavity depth:
- Hazards found:
Surface-mount notes
- Max width and height:
- Max depth before hitting faucet or light:
Placement
- Bottom height from floor:
- Center height from floor:
- Clearance to light and outlets:
Hinge and swing
- Hinge side:
- Interference risks:
Model and finish
- Preferred size range:
- Finish and features:
Quick answers to common sizing questions
Should the cabinet be the same width as the vanity mirror it replaces?
Often yes, but it can be a bit narrower for balance. Keep at least 1 to 3 inches of wall space on each side so it does not feel cramped.
How high do I mount above the faucet?
Keep 3 to 8 inches above the faucet for splash and reach. Adjust for user height and any tall spout or handle.
Do I need to center it over the sink?
It looks best centered over the sink or between two sconces. If a stud forces a shift, use a surface-mount unit and center it visually.
Frequently Asked Questions of how to measure for medicine cabinet
How do I know if I can recess the cabinet?
Use a stud finder to locate studs and measure the space between them. If the cavity is deep enough and clear of pipes or wires, you can recess.
What is the standard rough opening for a recessed cabinet?
Many models fit between 16-inch-on-center studs with a rough width near 14 inches. Always check your model’s spec sheet for exact width, height, and depth.
How do I choose the right width above a 30-inch vanity?
A 20 to 24 inch wide cabinet often looks balanced over a 30 inch vanity. Leave at least 1 to 3 inches of wall space on each side.
How can I measure door swing without the actual cabinet?
Tape the outline and use a cardboard door the same width. Hinge it with painter’s tape and swing it to full open.
What if the light bar is too low for my cabinet height?
Choose a shorter cabinet or move the light higher. Another option is a surface-mount cabinet with less height and more usable depth.
Is a mirrored tri-view harder to measure for?
You measure the same way but check each door swing. Ensure there is side space so the outer doors do not hit sconces or walls.
How tall should a medicine cabinet be for tall users?
Aim for a center height near 62 to 64 inches from the floor. Keep enough space above the faucet and below the light for easy use.
Conclusion
You now know how to measure for medicine cabinet like a pro. Mark your centerline, test widths and heights, confirm depth, and check door swing before you buy. These small steps prevent returns and make install day smooth.
Pick your spot, grab a tape, and walk through the checklist today. If you want more help on how to measure for medicine cabinet for tricky layouts, subscribe for future guides or drop your questions in the comments.