Measure, level, shim, and anchor the corner base. Then mount and adjust the Lazy Susan.
If you’ve wondered how do you install a lazy susan corner cabinet without guesswork, you’re in the right place. I’ve installed dozens in real kitchens, from tight condos to full remodels. This guide breaks it down step by step, with pro tips, common pitfalls, and clear photos-in-your-head detail. By the end, you’ll know exactly how do you install a lazy susan corner cabinet the right way, even if it’s your first time.

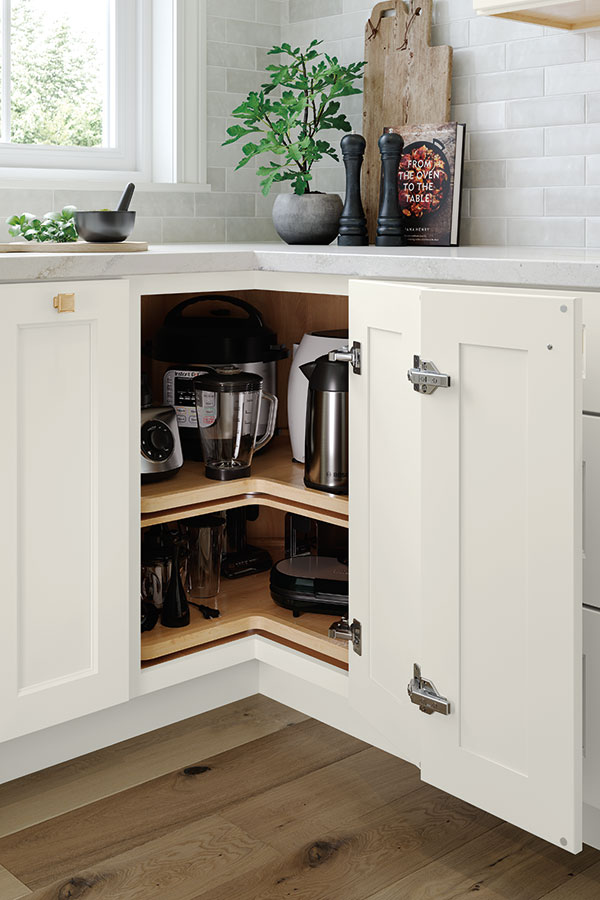
What Is a Lazy Susan Corner Cabinet?
A Lazy Susan corner cabinet is a corner base unit with rotating shelves that bring hard-to-reach items forward. It turns dead corner space into useful storage. Popular styles include pie-cut (doors attached to the shelves), full-round (shelves spin inside a standard door), and kidney-shaped (semi-round shelves with a cutout).
Cabinet construction matters. Face-frame cabinets give you a front frame to screw through. Frameless (European) cabinets rely on thicker sides and metal brackets. If you’re asking how do you install a lazy susan corner cabinet, knowing your cabinet type will guide your fastening points and hardware choices.
Expect standard sizes like 33-inch or 36-inch corner bases, but always confirm your model’s specs. Manufacturer instructions trump any generic advice.
Tools, Materials, and Prep Checklist
Have these ready so you’re not stopping mid-install:
- Tools: 4-foot level, torpedo level, tape measure, square, stud finder, drill/driver, impact driver, clamps, pry bar, rubber mallet, and a pencil.
- Fasteners: 2.5-inch cabinet screws for studs, 1.25-inch face-frame screws, and washers if needed.
- Shims and supports: Composite shims, ledger strip or temporary support cleats, and offcuts to prop sides.
- Safety: Safety glasses, ear protection, work gloves, and knee pads.
- Optional: Scribe tool, block plane, touch-up marker, and a headlamp for dark corners.
Tip from the field: I pre-drill a few cabinet-frame holes on the shop floor. It saves time in the corner. If you’re learning how do you install a lazy susan corner cabinet, prep is half the battle.

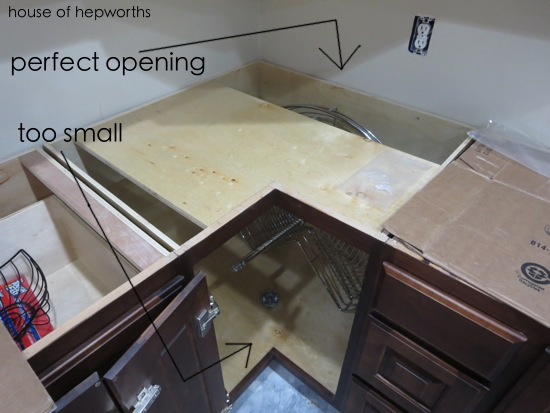
Measuring Your Space and Planning Layout
- Check plumb and level. Put a level on the floor where the cabinet will sit. Note high spots and plan to shim elsewhere.
- Find studs and mark them on the wall at 6 inches, 18 inches, and 30 inches heights. You’ll hit these when fastening the cabinet.
- Mark your layout lines. Snap or pencil a level reference at the cabinet top (34.5 inches for standard bases without countertop). Mark the cabinet edges on the floor and wall.
- Dry fit. Slide the cabinet in place without screws. Confirm door swing, appliance clearances, and toe-kick alignment.
- Plan the run. Many pros set the corner base first, then pull other cabinets to it. If walls are way out of square, plan for fillers to keep doors and drawers from binding.
Pro tip: If you’re asking how do you install a lazy susan corner cabinet in an older home, expect to scribe one side to a wavy wall. It’s normal.

Step-by-Step: How Do You Install a Lazy Susan Corner Cabinet
-
Dry fit and mark
Place the corner base in position. Trace around the base and mark stud locations on the inside of the cabinet for easy aim. -
Level the base
Find the floor’s high point. Shim under the cabinet’s bottom edges until the top is dead level front-to-back and side-to-side. Check all directions with a 4-foot level. -
Plumb the sides
Use a torpedo level on the face frame stiles or cabinet sides. Add thin shims between the cabinet and wall where needed to keep the box plumb. -
Anchor to studs
Drill pilot holes through the cabinet’s back rails (or metal brackets on frameless). Drive 2.5-inch cabinet screws into studs. Tighten until snug, not crushing the box. Recheck level as you go. -
Pull adjacent bases tight
Set the next base cabinet. Clamp face frames flush. Pre-drill and join with 1.25-inch screws through the hinge stiles. For frameless, use connector bolts through the sides with alignment blocks. -
Verify reveals and door clearance
Open and close doors. Check that the Lazy Susan doors have even gaps, no rubbing, and clear rotation. -
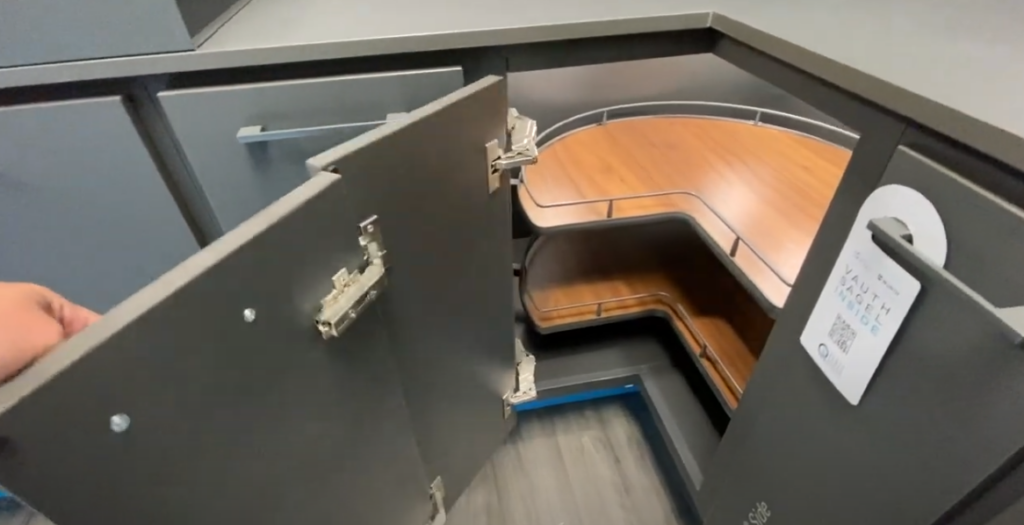
Install the Lazy Susan hardware
For pie-cut units, mount the center pole and shelves first, then attach doors to the shelf brackets. For full-round, install the pole and shelves, then hang the standard doors with hinges. -
Adjust everything
Dial hinge screws for door height, side gap, and in-out depth. Raise or lower shelf collars to level the trays. Spin each shelf a full 360 degrees. -
Final fastening and shim trim
Once satisfied, add any remaining screws to studs and trim protruding shims with a knife. Check level one last time.
On a recent install, the floor dipped 3/8 inch at the corner. I staged shims in three spots under the base, anchored the cabinet, then micro-shimmed at the wall to keep the face frame plumb. If you follow these steps, you’ll master how do you install a lazy susan corner cabinet without squeaks or scrapes.
Installing the Lazy Susan Hardware (Pie-Cut vs. Full-Round)
Every brand varies, but the flow is similar. Always follow your kit’s manual.
For pie-cut (doors attach to shelves)
- Mount the bottom bearing plate centered on the cabinet floor.
- Press-fit or screw the center pole into the bottom plate.
- Slide on lower shelf, set the collar height, and lock it.
- Add the top bearing bracket under the counter rail and insert the pole.
- Slide on the top shelf and set height so both trays clear the face frame.
- Attach door brackets to the shelf edges. Pre-drill to avoid splitting.
- Fasten doors to the brackets. Align door meeting edges perfectly.
- Adjust shelf collars and door bracket angles so doors meet centered and spin clean.
For full-round (shelves spin behind a standard door)
- Install pole and bearings top and bottom.
- Slide shelves on and set heights to clear hinges and opening.
- Add door bumpers and stops so the shelves don’t strike hardware.
- Spin-test both shelves under load before closing the door.
Small-gap trick: If doors kiss at the top, tilt the top collar a hair or ease the hinge depth one click. This tiny move often fixes it. That’s one of my favorite saves when explaining how do you install a lazy susan corner cabinet to new installers.

Adjustments, Alignment, and Troubleshooting
- Shelf rubs the frame: Raise the shelf collar 1/8 inch and re-test. Check if the cabinet is out of level.
- Wobbly spin: Tighten the top and bottom bearings. Confirm the pole is fully seated in both plates.
- Doors won’t close: Adjust hinge in-out depth. Loosen door bracket on the shelf and nudge it 1–2 mm.
- Clicking noise: Look for a screw tip protruding into shelf travel. Back it out or swap to a shorter screw.
- Door gaps uneven: Level the cabinet first, then fine-tune hinges. Don’t fight hinges on an unlevel box.
If a client asks how do you install a lazy susan corner cabinet so it stays quiet, I say: get the box square, then touch the hardware last.

Common Mistakes and How to Avoid Them
- Skipping the level check: A crooked base makes perfect hardware look bad.
- Overtightening screws: This can rack the box or strip thin back panels.
- Ignoring wall bows: Shim behind the cabinet, not just under it.
- Misplacing the center pole: Even a 1/4-inch off-center can cause rub.
- Not dry-fitting doors: Especially on pie-cut units, test fit before final screws.
Whenever I teach apprentices how do you install a lazy susan corner cabinet, I stress: slow is smooth, smooth is fast.
Safety, Code, and Warranty Notes
- Always anchor to studs. Drywall alone will not hold a loaded cabinet.
- Use proper eye and ear protection. Corners are cramped and loud with drivers.
- Follow the hardware brand’s weight limits. Overloading will void warranties.
- For stone counters, confirm the cabinet top rails align and can handle support brackets.
If you’re asking how do you install a lazy susan corner cabinet to last 20+ years, the answer is: respect the load path and the manufacturer’s limits.

Care and Maintenance Tips
- Clean bearings and trays twice a year. A soft brush and mild soap help.
- Tighten hinge and bracket screws yearly. Vibrations loosen them over time.
- Avoid harsh cleaners that can dull melamine or warp wood trays.
- Store heavier items on the lower shelf to reduce wobble.
These simple habits keep a smooth spin and quiet doors.
Cost, Time, and Skill Level
- Time: 2–4 hours for cabinet setting, 30–60 minutes for hardware and doors.
- Cost: Cabinet prices vary widely. Hardware kits range from budget to premium, with soft-close options.
- Skill: Confident DIYers can do it with care. First-timers should go slow and measure twice.
If budget clients ask how do you install a lazy susan corner cabinet efficiently, I suggest pre-drilling, labeling shims, and staging tools within arm’s reach.
Quick PAA-Style Q&A
-
How long does it take to install?
Most corner base installs take half a day, including adjustments. Add more time for tricky walls. -
Do I set the corner base first or last?
Set the corner base first. It anchors the layout for the rest of the run. -
Can I reuse old Lazy Susan hardware?
Sometimes, but mixing brands is risky. Use hardware that matches your cabinet and follow its manual.
Frequently Asked Questions of how do you install a lazy susan corner cabinet
Do I need special screws for a Lazy Susan corner cabinet?
Use cabinet-rated screws into studs, typically 2.5 inches long. Shorter screws are fine for face-frame joins and brackets.
What if my floor is not level?
Shim the cabinet until the top is level in both directions. Lock it to studs, then trim shims flush.
How do you install a lazy susan corner cabinet in a frameless kitchen?
Use side brackets and through-bolts as the manual shows. Confirm shelf clearances since frameless openings are tighter.
Can I install the Lazy Susan after the countertop is on?
Yes, if the cabinet design allows internal access. It’s easier to install before the countertop, but not required.
How do I keep the doors from rubbing?
Level the cabinet first, then adjust hinge depth and shelf height. Tiny moves of 1–2 mm make a big difference.
What size corner cabinet should I buy?
Common sizes are 33 or 36 inches, but check your layout. Make sure adjacent cabinets and appliances have clearance.
How do you install a lazy susan corner cabinet without gaps showing?
Use fillers and scribe to the wall when needed. Clamp and join frames tightly and adjust hinges for even reveals.
Conclusion
You’ve seen the full process: plan, level, shim, anchor, then mount and tune the hardware. When someone asks how do you install a lazy susan corner cabinet with pro results, the real secret is patience and precise adjustments. Take your time, follow the manual, and test every spin.
Ready to start? Save this guide, gather your tools, and tackle that corner with confidence. If you found this helpful, subscribe for more step-by-step kitchen upgrades or leave a comment with your questions.