
Turn off power, mount a fan-rated box, wire, hang, and balance.
You’re here to learn How to Install a Ceiling Fan the right way, and you’ll get it done with confidence. This How to Install a Ceiling Fan guide blends clear steps, code-smart tips, and hard-won experience. By the end, you’ll know How to Install a Ceiling Fan on a standard or sloped ceiling, with a light kit or remote, safe and smooth.
Safety First and Tools You’ll Need
Before you start any How to Install a Ceiling Fan project, safety rules come first. A fan is heavy and spins fast. Your support and wiring must be solid.
Safety checklist
- Shut off the circuit at the breaker and verify with a non-contact tester.
- Use a fan-rated electrical box and brace, not a standard fixture box.
- Keep blades at least 7 feet above the floor and 18 inches from walls.
- Use a sturdy ladder with level footing and someone nearby if possible.
Tools
- Non-contact voltage tester
- Screwdrivers and nut driver
- Wire stripper and UL-listed wire connectors
- Adjustable wrench or socket set
- Pliers and electrician’s tape
- Stud finder and tape measure
- Ceiling fan rated box/brace kit, mounting bracket, and downrod if needed
Materials
- Ceiling fan kit with blades, motor, hardware, and, if included, a light kit
- Extra 12 or 14 AWG copper wire if extending leads
- Fan-rated box (meets NEC 314.27(C)) and brace rated for ceiling fans
Pro note from the field: If the box wiggles, stop. Replace it with a fan-rated brace kit. Shortcuts here cause wobble and danger later.

Plan the Location and Check the Electrical Box
Planning is half of How to Install a Ceiling Fan success. A stable mount makes all the difference.
Room and size
- Under 100 sq ft: 36–44 inch fan
- 100–250 sq ft: 48–54 inch fan
- Over 250 sq ft: 56–72 inch fan
Height and downrod
- Ideal blade height is about 8–9 feet above the floor.
- Use a downrod to drop the fan if your ceiling is high.
- Flush-mount for low ceilings to keep clearance.
Electrical box and support
- The box must be marked “fan rated.” It supports dynamic loads up to 70 lb or more.
- For attic access, install a joist-mounted or brace-style fan box.
- For finished ceilings, use an expandable brace kit rated for fans.
Sloped ceilings
- Use a sloped-ceiling adapter if the pitch is over 15 degrees.
- A longer downrod often improves blade clearance on steep slopes.
Step-by-Step: How to Install a Ceiling Fan
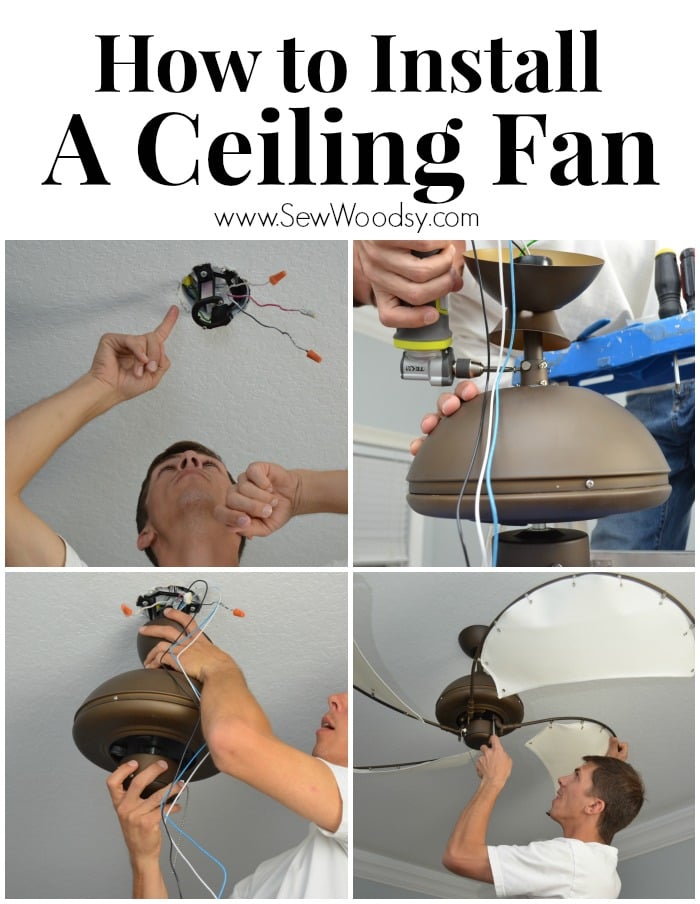
Follow these steps to master How to Install a Ceiling Fan the right way. Take your time and check each connection.
-
Kill power and confirm
- Turn off the breaker. Test all wires with a non-contact tester.
-
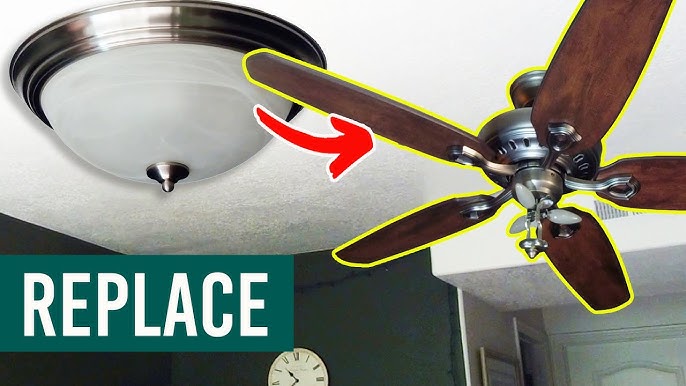
Remove the old fixture
- Lower the fixture. Support it while you disconnect the wires.
- Remove the old box if it’s not fan rated.
-
Install the fan-rated box and brace
- Center the brace between joists and crank it tight.
- Attach the fan-rated box and secure with the provided screws.
-
Mount the bracket
* Fasten the fan’s mounting bracket to the box.- Tighten all screws firmly. The bracket should not move.
-
Prep the fan on the floor
- Assemble the downrod, canopy, and motor per the manual.
- Pull the wires through the downrod. Tighten the downrod set screws and cotter pin.
-
Hang the motor
- Lift the motor and rest it on the bracket’s hook or slot.
- Do not let it dangle by the wires.
-
Make the wire connections
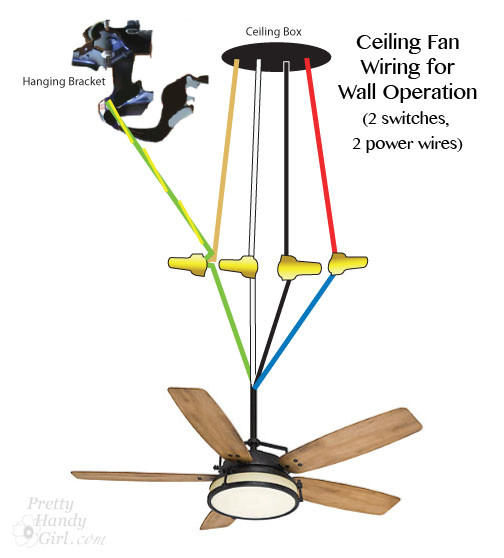
- Typical single-switch: house black to fan black (motor), house white to fan white (neutral), grounds together.
- If your fan has a light: house red (switched hot) to fan blue (light), or tie both fan black and blue to house black if you have one switch.
- Twist wires tight, cap with UL-rated connectors, and tape if needed.
-
Tuck wires and attach the canopy
- Neatly fold wires into the box.
- Slide up the canopy and secure it.
-
Install blades and light kit
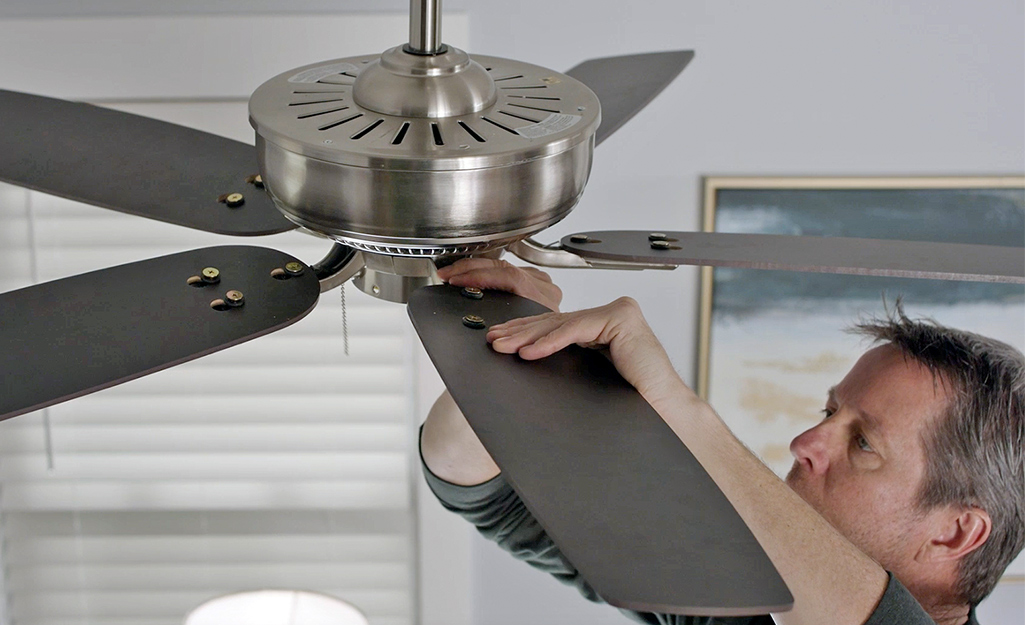
- Attach blade arms to the motor, then blades to the arms.
- Attach the light kit and bulbs. Use LEDs rated for enclosed fixtures if applicable.
-
Add the remote receiver (if included)
- Place the receiver in the canopy space.
- Wire it per the diagram. Avoid pinching wires.
-
Turn power on and test
- Test all speeds and the light.
- If there’s wobble, use the balancing kit. Move the clip along the blade edges to find the sweet spot.
-
Set the blade direction
- Summer: counterclockwise for cooling breeze.
- Winter: clockwise on low to recirculate warm air.
Field tip: I pre-start all canopy screws before lifting the motor. It makes alignment easy and saves your shoulders.
Wiring Guide and Diagrams in Plain English
Clear wiring is the heart of How to Install a Ceiling Fan work. Know what each color means.
Common wire colors
- Black: fan motor hot
- Blue: light kit hot
- Red: switched hot from a second switch
- White: neutral
- Green or bare: ground
Scenarios
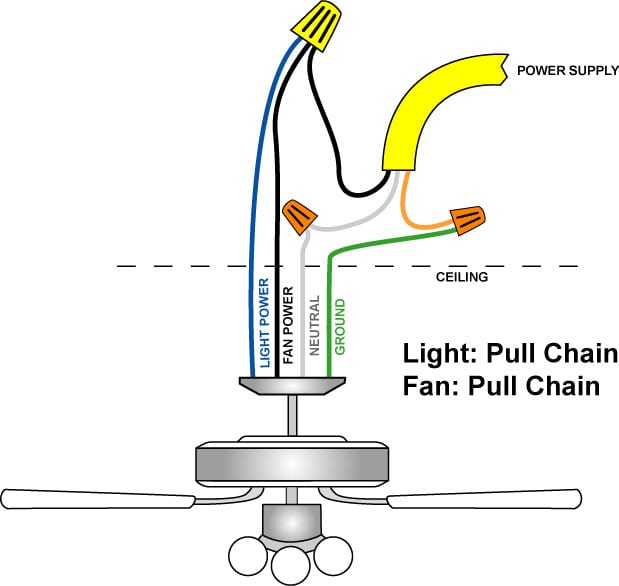
- One switch, no light: black (house) to black (fan), white to white, grounds together.
- One switch with light: black (house) to both black and blue (fan and light tied together).
- Two switches: black (house) to black (fan), red (house) to blue (light), white to white, grounds together.
- Remote kit: line and neutral feed the receiver; receiver outputs to fan motor and light.
Old homes and special cases
- If you see aluminum wiring, stop and call a pro. It needs special connectors.
- If your neutrals are tied and hidden, do not untwist them without a plan.
- If there’s no ground, upgrade the circuit or consult an electrician.
Code notes
- NEC 314.27(C) requires fan-rated boxes.
- AFCI protection is often required in bedrooms and living areas.
- Follow the fan’s instructions. They are part of the listing and code compliance.
Troubleshooting and Fine-Tuning
Even a careful How to Install a Ceiling Fan job can need tweaks. Small fixes go a long way.
Wobble
- Verify the bracket and box are tight.
- Swap two blades or balance with the kit. A quarter inch in blade height can matter.
Noise and hum
- Tighten every screw on blade arms and light kit.
- Check the globe gaskets. Add a thin felt pad if glass chatters.
Remote or wall control issues
- Use a fan-rated speed control, not a light dimmer.
- Some LEDs buzz on older controls. Use fan-safe dimmable bulbs.
Poor airflow
- Lower the fan with a longer downrod if the ceiling is high.
- Ensure blade pitch is factory set and arms are not bent.
Tripping breakers
- Check for a short at the bracket from a pinched wire.
- Confirm the neutral is not shared incorrectly with another circuit.
Energy, Comfort, and Code Considerations
Good planning makes How to Install a Ceiling Fan pay off year-round. Small choices add comfort and savings.
Airflow and efficiency
- Look for high CFM at medium speed. It’s quieter and efficient.
- ENERGY STAR fans move more air per watt.
Comfort tips
- Summer: counterclockwise to feel cooler at the same thermostat setting.
- Winter: clockwise on low to mix warm air without a draft.
Placement rules of thumb
- Center over seating or bed.
- Keep blades at least 10 inches from the ceiling and 18 inches from walls.
Permits and inspections
- Some regions require permits for new circuits or boxes.
- Use a listed fan-rated box and follow labeling. Inspectors look for that mark.
Pro Tips from the Field
Here are lessons I use on every How to Install a Ceiling Fan. They save time and prevent call-backs.
What I do every time
- Dry-fit parts on the floor. Confirm screw lengths match the canopy depth.
- Label house wires before removal. Photos help with two-switch setups.
- Pre-balance blades by weighing them in your hand. Minor defects show up.
- Add a small drop of blue thread locker to blade screws if the manual allows.
- Vacuum drywall dust from the box. Dust leads to loose wirenuts.
Mistakes to avoid
- Using a standard plastic box. It can fail under spin load.
- Mixing remote receivers with smart switches. Pick one control method.
- Overtightening glass shades. Snug is enough.
Time and cost sense
- A first-time install can take 2–3 hours. Plan the day.
- A fan-rated brace kit costs less than a damaged ceiling. Spend it once.
Frequently Asked Questions of How to Install a Ceiling Fan
Do I need a fan-rated electrical box?
Yes. A standard fixture box is not designed for spinning loads. A fan-rated box is required by code and prevents wobble and failure.
Can I install a ceiling fan on a sloped ceiling?
Yes, with a sloped-ceiling adapter and a downrod. Check the fan’s maximum supported slope and clear wall and ceiling edges.
What if I only have two wires in the ceiling?
You can run both the fan and light from one switch using the pull chains or a remote. To control fan and light separately, you need an extra conductor or a receiver kit.
Which way should the fan spin in summer and winter?
Summer: counterclockwise for a cooling breeze. Winter: clockwise on low to gently push warm air down without a draft.
How long does it take to install a ceiling fan?
Most first-time installs take 2–3 hours. Replacements using an existing fan-rated box often take about 60–90 minutes.
Can I use a dimmer switch to control fan speed?
No. Use a fan-rated speed control. A light dimmer can damage the motor and cause hum.
What size ceiling fan do I need for my room?
Small rooms under 100 sq ft typically use 36–44 inch fans. Medium rooms need 48–54 inches, and large rooms may need 56–72 inches or dual fans.
Conclusion
You now know How to Install a Ceiling Fan from box to balance. With the right support, clear wiring, and a careful test, you’ll get quiet airflow and year-round comfort. Take your time, follow the steps, and trust your checks.
Ready to tackle your next room? Save this guide, share it with a friend, and drop your questions or wins in the comments.